10 min to read
The Easiest Way to Deploy Machine Learning Model to Production for Free
Several steps are involved in deploying a machine learning model to production, but these steps can be complicated and expensive. This article focuses on the most straightforward and easiest way to deploy a machine learning model to production for free by using Streamlit. Streamlit provides a way to build your model and a user interface(frontend) to use the model in the same code. It also help to deploy your model to the web instantly and provides a link to your web app to give anyone access to use your machine learning model in production.
This article does not cover the process of training and testing a machine learning model, we assume you have trained, tested and saved your model. It will also not cover the basics of Git. All you need to know about Git are basic terminologies in Git, how to clone a repository and update the change.
There are four major platforms to deploy your model to production for others to use
- As a web app
- As a mobile app
- On an IoT
- As an API
You must have gotten an insight into the platform we will be using from the usefulness of Steamlit highlighted above. We will use Streamlit to deploy machine learning models as a mobile app. We will build a simple web app that predicts objects in an image(image classification). We will use restnet18 pre-trained model by Pytorch, which was trained on the Imagenet dataset.
Enough of introduction, let’s get into it. Complete can be clone here
Installations
First you need to install all dependencies. We have only two dependencies, PyTorch to get the machine learning model and Streamlit to create a user interface and deploy the model.
If you clone the repository you can do this
pip install -r requirement.txt
OR
pip install torchvision==0.9.1 streamlit
This will install PyTorch and streamlit.
Imports
Import all the packages required. I will explain the important of each import later as I work you through the code.
import os
import json

import streamlit as st

from PIL import Image
from torchvision import models, transforms
Loading saved model
Create a function to load resnet18 model from PyTorch and get the classes of the model(imagenet class index) by downloading it from here. Instead you can also load your customized saved model or other pretrained model
def load_model():
   # Make sure to pass `pretrained` as `True` to use the pretrained weights:
   model = models.resnet18(pretrained=True)
   # Since we are using our model only for inference, switch to `eval` mode:
   model.eval()

   imagenet_class_index = json.load(open(f"{os.getcwd()}/data/imagenet_class_index.json"))

   return model, imagenet_class_index
Preprocessing
The transform_image function can also be seen as the preprocessing function. This is used to resize the image to the required size for the model, convert from image to tensor, and normalise the image tensor based on the mean and standard deviation of each channel in the imagenet dataset . You can replace this with your preprocessing process.
def transform_image(image):
   """ Transform image to fit model

   Args:
       image (image): Input image from the user

   Returns:
       tensor: transformed image
   """
   transformation = transforms.Compose([transforms.Resize(255),
                                       transforms.CenterCrop(224),
                                       transforms.ToTensor(),
                                       transforms.Normalize(
                                           [0.485, 0.456, 0.406],
                                           [0.229, 0.224, 0.225])])
   return transformation(image).unsqueeze(0)
Creating a User Interface(UI) with Streamlit
Streamlit provides several API to create a user interface for your machine learning model. We will create a user interface that a user can use to upload an image and to display our prediction to the user.
st.title is used to create a header(title) for the web app st.write is used to write anything on the web app
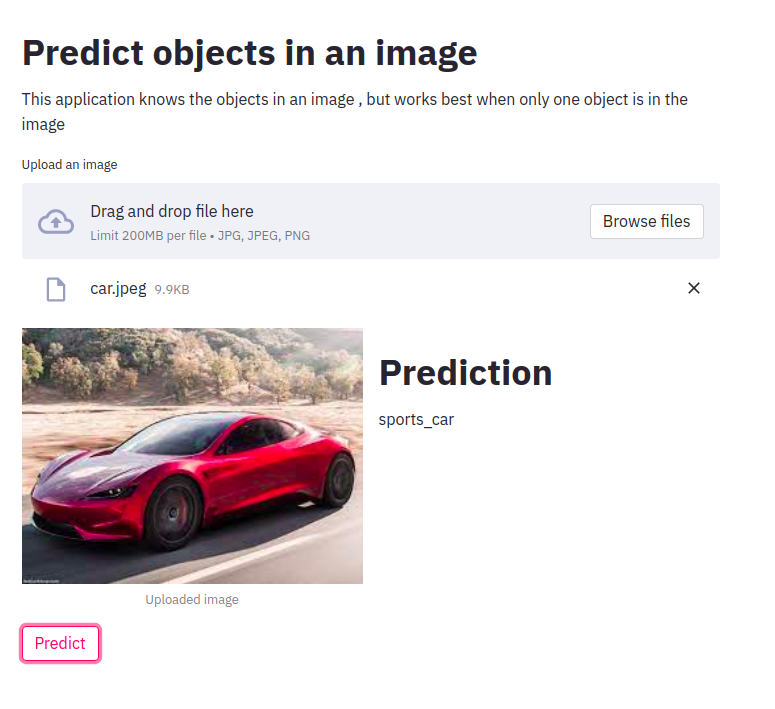
st.title("Predict objects in an image")
st.write("This application knows the objects in an image , but works best when only one object is in the image")
We get our model and imagenet classes by calling load model function.
model, imagenet_class_index = load_model_info()
Create a button for the user to upload an image(file) and we specify the format of image that should be uploaded.
image_file = st.file_uploader("Upload an image", type=['jpg', 'jpeg', 'png'])
Once the image is uploaded, the user will see the uploaded image, and a Predict button will be shown below the image. We divided the web page into two columns with st.beta_columns, so that we can display the image on the left and the prediction on the right. We can display the image using st.image, but since we have divided the webpage into two, we use the left column.
if image_file:

       left_column, right_column = st.beta_columns(2)
       left_column.image(image_file, caption="Uploaded image", use_column_width=True)
       image = Image.open(image_file)

       pred_button = st.button("Predict")


       if pred_button:

           prediction = get_prediction(image, model, imagenet_class_index)
           right_column.title("Prediction")
           right_column.write(prediction)
When the user click Predict button, iti calls the get_prediction function. get prediction function transform(preprocess) the image, get prediction from the model, then return the class of the prediction. This predicted class will be shown on the right column of the web app
def get_prediction(image, model, imagenet_class_index):
   tensor = transform_image(image=image)
   outputs = model.forward(tensor)
   _, y_hat = outputs.max(1)
   predicted_idx = str(y_hat.item())
   return imagenet_class_index[predicted_idx][1]

Testing your model locally
Run this command on your terminal. It will provide you with a link to your localhost, where you access your web app. You don’t have to name the file app.py. You can replace app.py with the python file name that contains your main function and the streamlit user interface code.
streamlit run app.py
Deployment to production
First, you need to request for invitation from Streamlit, so that Streamlit can add your Github profile to their list. Push your project to Github. Once your request has been accepted, you should add the repository to your project, the branch and the path to the file containing your main function and streamlit code which will be ran in production. Finally, you get a link to your web app that will give you access to test your web app in production. You can share the link with your friends and other users to give them the opportunity to use your model. You can check out my app here
Complete code
import os
import json

import streamlit as st

from PIL import Image
from torchvision import models, transforms

def get_prediction(image, model, imagenet_class_index):
    tensor = transform_image(image=image)
    outputs = model.forward(tensor)
    _, y_hat = outputs.max(1)
    predicted_idx = str(y_hat.item())
    return imagenet_class_index[predicted_idx][1]


def transform_image(image):
    """ Transform image to fit model

    Args:
        image (image): Input image from the user

    Returns:
        tensor: transformed image
    """
    transformation = transforms.Compose([transforms.Resize(255),
                                        transforms.CenterCrop(224),
                                        transforms.ToTensor(),
                                        transforms.Normalize(
                                            [0.485, 0.456, 0.406],
                                            [0.229, 0.224, 0.225])])
    return transformation(image).unsqueeze(0)


@st.cache
def load_model():
    # Make sure to pass `pretrained` as `True` to use the pretrained weights:
    model = models.resnet18(pretrained=True)
    # Since we are using our model only for inference, switch to `eval` mode:
    model.eval()

    imagenet_class_index = json.load(open(f"{os.getcwd()}/data/imagenet_class_index.json"))

    return model, imagenet_class_index


def main():

    st.title("Predict objects in an image")
    st.write("This application knows the objects in an image , but works best when only one object is in the image")


    model, imagenet_class_index = load_model()

    image_file  = st.file_uploader("Upload an image", type=['jpg', 'jpeg', 'png'])

    if image_file:

        left_column, right_column = st.beta_columns(2)
        left_column.image(image_file, caption="Uploaded image", use_column_width=True)
        image = Image.open(image_file)

        pred_button = st.button("Predict")


        if pred_button:

            prediction = get_prediction(image, model, imagenet_class_index)
            right_column.title("Prediction")
            right_column.write(prediction)

if __name__ == '__main__':
    main()
In this article, you learned how to deploy a machine learning model to production using Streamlit.


Comments